Tutorials
These tutorials are also available as a pdf file.
You can also refer to the NodeBox tutorial for more help and instruction on using Spryte.
the basics +
a few more basics +
logic +
animate & interact +
libraries +
advanced +
compositing +
© info
basic shapes
There are a number of native shape-drawing commands available in Spryte. These
enable you to draw rectangles, ovals, lines, arrows, and stars without having
to define all of the coordinates required. In other words, instead of having to
calculate where all the points of a star should be plotted, you can just use
the star() command with a few arguments. For example, this star
is plotted on a white background, at an x and y coordinate of 100:
background(1)
fill(1, 0, 0)
star(100, 100)

squares and rectangles
Here is a simple exmaple of how you would go about drawing a square. The
arguments/values of the square are defined in the round-brackets that follow
the rect() command. In this case, the first two values specify
that the square is positioned at an x-coordinate of 100 and y-coordinate of 35.
The third and forth values represent the width and height respectivley -- in
this case, 80 x 80 pixels.
background(1)
fill(1, 0, 0)
rect(100, 35, 80, 80)

These x and y coordinates are relative to the canvas, and correspond to the top left of the rectangle (this can be reconfigured, but this is explained in the transforms section of this tutorial):

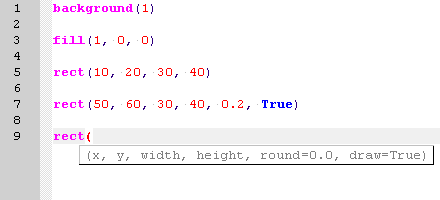
The Spryte IDE provides code hints for most commands,
including those for shape-drawing. These hints are easy to interpret, and an
understanding of how to use them makes writing Spryte code far easier. In this
example you can see the rect() code hint popping-up as the the
round bracket is typed immediately following the rect command:

other shapes
However, you should first change the background colour of your canvas. Add the
background(1) command to the above code:
background(1)
rect(10, 10, 10, 10)


